Monday, March 31, 2008
How to view this Blog
Most blogs read with the most recent posts showing up first. I have changed the dates of the posts to have this blog read like a book. After viewing the first page click the link for "older posts" to go to the next page.
I have named her Dorothy


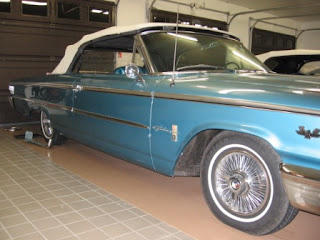
In late December 2005 my friend Tom Nahodil and I traveled from Cleveland, Ohio to Gatlinburg, Tennessee to purchase a 1963 Galaxie XL 500 convertible. I bought the car from Mark Hinds. Mark performs as a Kenny Rogers double in a tribute show.
What makes this car special to me is the color and that in 1966 I learned to drive in a car identical to this one.The color is called Ming Green which is a dark metallic turquoise.
I have named her Dorothy after my Mom who was the owner of the car I learned in. Pretty cool car for a Mom! My Mom said it looks the same but hers was smaller.
I parked her in the garage with my white 1963 Galaxie, my black 1980 V-8 MGB and my wifes 2002 white T-bird.
Sunday, March 30, 2008
Disassembly


.JPG)
I started taking it apart almost immediately. My original plan was to re-do the interior and touch up the marks on the body. I could see a few nicks and one area of rust. I also planned on detailing the engine compartment.
I found a mess under the carpet. Roofing tar and sheet metal covered the passengers floor. What a mess! The original metal was pitted pretty bad but it was also very solid. The padded dash was badly cracked and the carpet was shot. The seats had been recently recovered but the were in need of new foam. All of the interior panels were in very good shape.
Saturday, March 29, 2008
Cleaning up the bottom


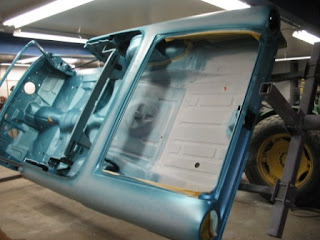
We removed the engine and I moved the car to Mike Kichka at Finishing Edge for the body work and bottom clean up. Mike is located in Twinsburg, Ohio. Mike had given me some ideas for the steps we should take and he allowed me to work on the car. They had a fixture to tilt the car up on its side for the bottom clean up. I spent quite a few hours over there scraping and cleaning. It very quickly became evident this was not going to be easy or quick.

Friday, March 28, 2008
Separation


After endless hours of scraping on the bottom we decided to separate the body and frame. There are only sixteen or so bolts holding the body on the frame. Mike had a rotisserie for the body.
This appealed to me because I could now to take the chassis back to my shop and Mike could work on the body.
We are now about six months into the project.
Thursday, March 27, 2008
Chassis
Wednesday, March 26, 2008
Frame after blasting
Tuesday, March 25, 2008
Monday, March 24, 2008
Sunday, March 23, 2008
Steering assembly
Saturday, March 22, 2008
Meanwhile back at Finishing Edge


Mike and the guys mounted the body to a rotisserie. This required bracing up the door openings. We were now able to continue cleaning all the crud off the bottom. I was able to do the majority of the cleaning myself. My friend Joe Bacik contributed a few Saturdays. Mike also started the repairs to the sheet metal. I also finished removing all the trim.
Friday, March 21, 2008
Progress on the chassis


Joe and I continued to assemble the chassis. The front suspension went on next followed by the engine and transmission. The engine was rebuilt by C & M machine in Ohio. My friend Kevin Clinton at Wiseco Piston in Mentor made a custom set of pistons for me. I had the transmission looked at and it only needed new gaskets. Mike came to my shop to paint the engine. The valve covers on the engine are temporary.
We now had a complete rolling chassis.
We are also a little over a year into the project!
Thursday, March 20, 2008
Paint removal and blasting the bottom


The doors, the fenders and the trunk lid went to media blasting. They were blasted with a plastic media that minimizes warping. On the rest of the body paint we used a chemical stripper. Somewhere along the line I got the brilliant idea to sand blast the bottom of the car and the trunk. I used a granite media that did a great job. Special thanks to Joe Bacik and Shaun and Mike Kichka for all their help with this nasty job. I am very glad we added this step. It improved the end result. You can see in the pictures where the lower rear quarter panel was patched. This repair was old and brazed in place. All we did was camouflage it to restore the bottom stamping lines. Most of the underneath was very solid.
Wednesday, March 19, 2008
Seat belts and seam sealer


I have six grand kids that I hope will ride in this car. For that to happen I will need rear seat belts. The front seats came with seat belt mounts but not the back. I made some reinforcement plates for the rear seat belts and welded them in place.
Mike and I spent a day reapplying the seam sealer to the underside, the firewall and the cockpit. I was on the caulking gun and Mike was brushing it to make it look factory original.
Tuesday, March 18, 2008
Final primer


We now had all the body work done and the whole car primed in metal etch. The car next went into the booth for a coat of polyester primer and a guide coat for final block sanding. The bottom was first painted with a rubberized undercoating and then black paint. I hope this will be easy to keep clean
Monday, March 17, 2008
The color goes on!


We have finally reached the color stage. It has now been two years. Things are starting to happen fast though.
The firewall, cockpit and trunk along with all the cutting in was done with the body still on the rotisserie. The body will be assembled back on the chassis with the doors on for the rest of the paint. The fenders, trunk lid and hood will all be painted separately. The car with the fenders on is to long to fit in the paint booth.
Subscribe to:
Posts (Atom)


